
What number of occasions have you ever handed your iPhone to anyone with the hope they’ll take an Instagram-ready pic of you, simply to finish up with a crooked picture, as a result of this particular person… hates you!
OK, perhaps the photographer doesn’t hate you, however you’ll completely love a few of the iPhone digicam ideas I’ve gathered right here. They need to enable you:
- Take straight pictures
- Take extra interesting selfies
- Be much less distracted when taking pictures
- Get a extra dramatic image each single time (no enhancing wanted)
The very best half? These options take actually seconds to arrange (or be taught), and when you begin utilizing them, you’ll by no means look again. And so they aren’t just a few ideas and tips I’ve picked so I can put collectively this text (what am I, ChatGPT?!). I take advantage of each single one among them on iPhone 13 mini and the iPhone 15 Professional Max I’ve for testing.
Now, let’s make you a greater iPhone photographer…
10 “secret” iPhone digicam tips and settings take seconds to arrange, and can without end change the way in which you are taking pictures together with your iPhone
In contrast to people, pictures of people have just one orientation – straight! Utilizing the Stage in your iPhone digicam must be an modification within the structure.
Flip in your iPhone digicam “Stage” and by no means take a crooked picture once more
First on my tremendous helpful iPhone digicam settings listing has obtained to be the “Stage” function you may activate by going to Settings > Digicam > Stage.
As I mentioned within the intro, actually everybody appears to take crooked pictures, which may typically spoil the second you’re making an attempt to seize. The answer isn’t any rocket science…
The iPhone’s “Stage” function is a white line that seems in the midst of your digicam viewfinder, which works yellow when you’ve nailed the superbly straight angle of your picture. Even higher, your iPhone vibrates once you’ve nailed the composition. One tip for Apple could be to make this vibration stronger.
iPhone’s mirrored selfies will trick your mind into liking your selfies far more
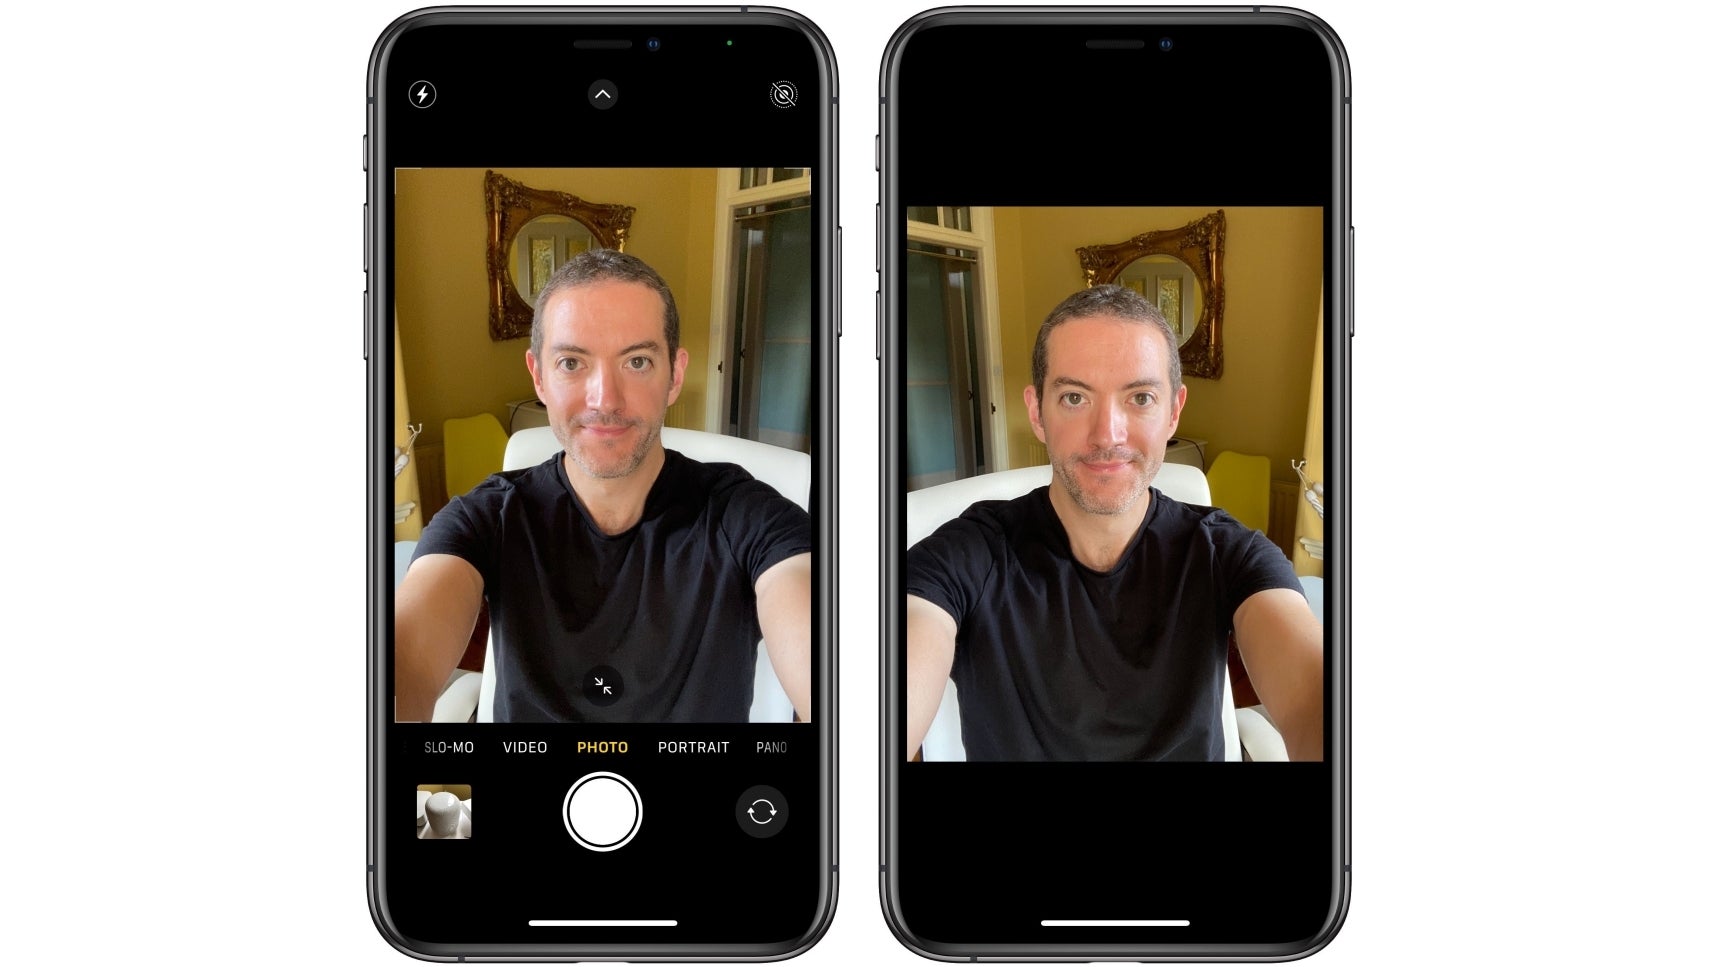
Mirrored selfies can look higher as a result of your mind thinks so!
For the subsequent one, you’ll go to Settings > Digicam > Mirror Entrance Digicam.
And the rationale you may need to do that’s as a result of people are used to seeing and liking the way in which they seem within the mirror, which is definitely the other of how different individuals see us. Therefore why many individuals have a tendency to search out mirrored selfies extra flattering.
I’m positive virtually everybody, at one level, has gone to the iPhone’s picture editor and flipped their selfie round to see if it seems higher. Properly, if you happen to like your “mirrored” selfies higher, now you don’t have to do that each single time. Or maybe this function is turned on, and also you need to flip it off, since you need to seem extra “genuine” in selfies.
Anyway, that’s greater than sufficient time spent on speaking about self-importance. Let’s transfer on…
Your iPhone tries to distract you once you’re taking a photograph – right here’s the way to change that
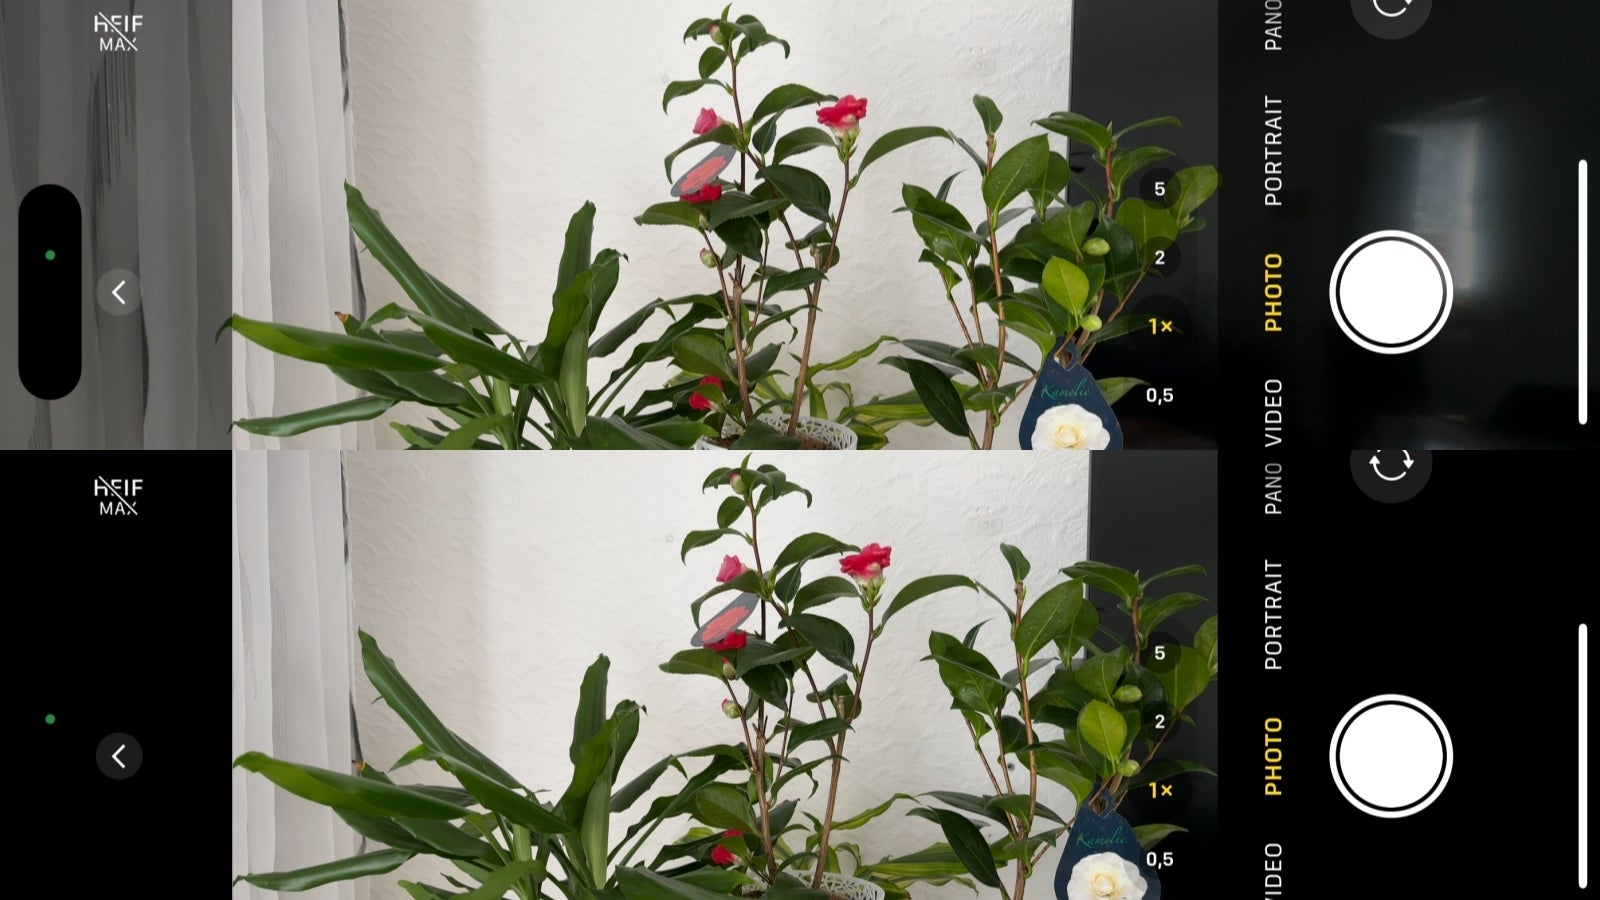
View Exterior the Body ON (high) vs View Exterior the Body OFF.
For this one, you’ll have to go to Settings > Digicam > View Exterior the Body.
New iPhones ship with the “View Exterior the Body” function turned on for 2 causes: For one, they’ve zoom and ultra-wide-angle cameras, and Apple desires to remind you they’re out there to make use of by displaying a wider body of view beneath what is basically your digicam viewfinder. And two – I suppose this makes the expertise of utilizing the digicam really feel extra immersive.
Nevertheless, I in a short time realized how distracting seeing outdoors the body I’m making an attempt to seize may be – particularly when it’s a busy shot, or one with motion. To not point out, the Dynamic Island exhibits up when this digicam setting is turned on, and I don’t suppose anybody must see it.
Having the left and proper facet of my viewfinder blacked out makes for a approach simpler, much less distracting picture taking expertise, and I’m positive most of one can find this to be true.
iPhone can alter the scale of your face and the form of what you are taking a photograph of – except you alter this setting
If I had been you, I’d instantly change my iPhone’s major digicam default focal size from 1x to 1.5x Merely go to Settings > Digicam > Predominant Digicam > Set default lens to 35mm (1.5x). Alternatively, you may all the time change again/forth between the 2 within the digicam app.
See, when taking pictures with my iPhone 13 mini, I’d zoom in a bit bit, as a result of this fashion I don’t must get too near my topic, which makes my picture look extra pure. Now, this function is one thing you may activate in your iPhone 15 digicam settings, which is superior.
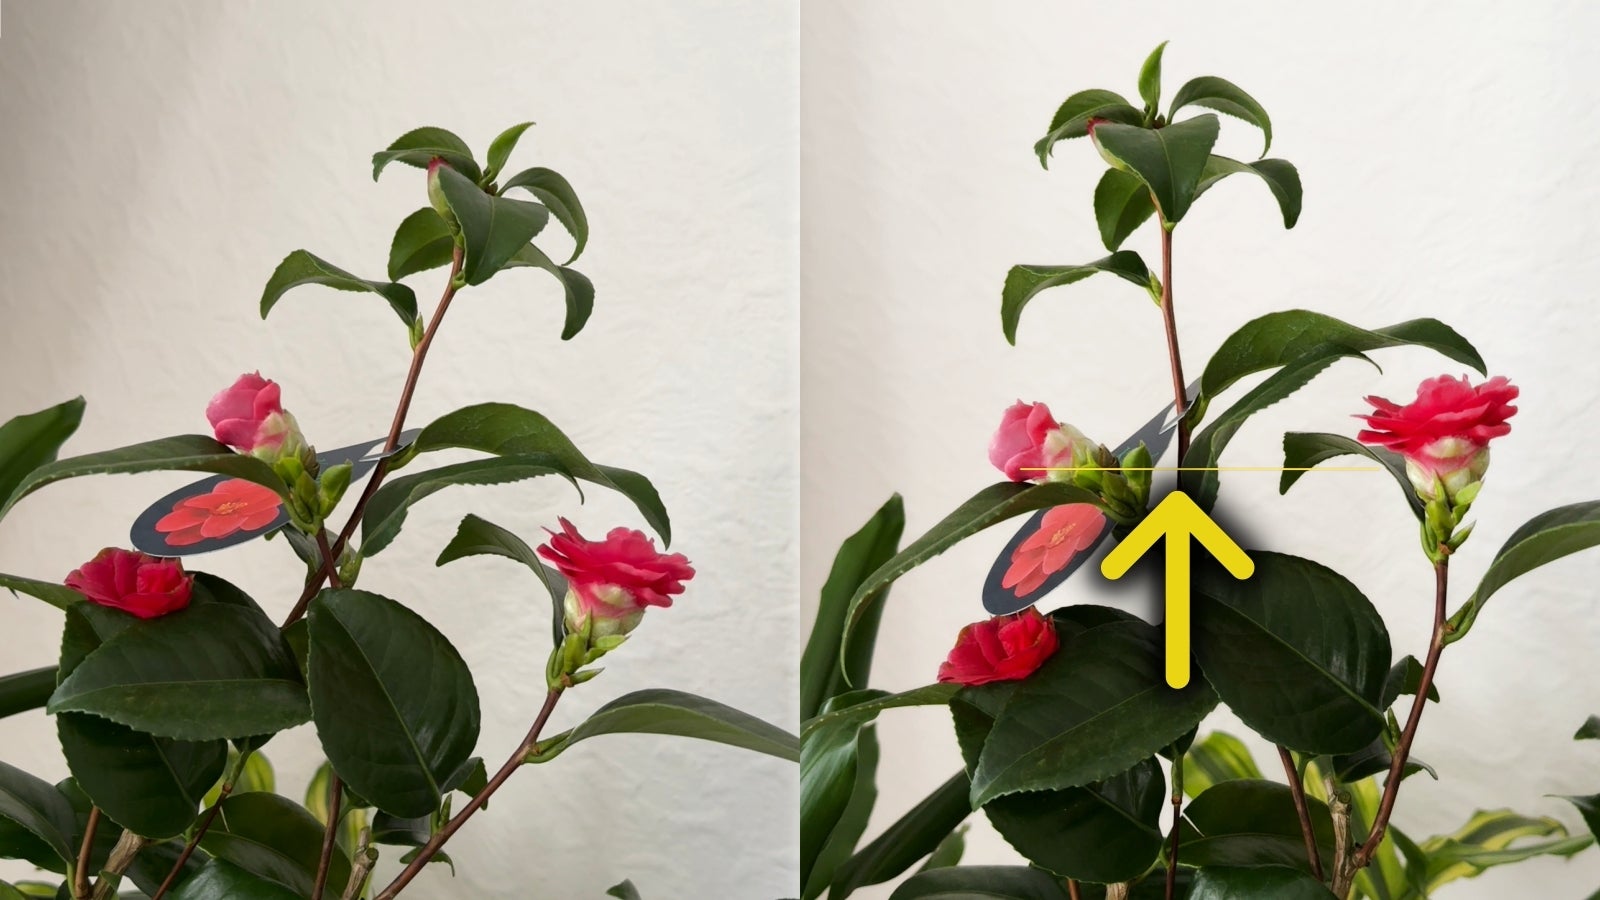
As you may see within the picture pattern above, stepping again and zooming to 35mm (1.5x) as a substitute of standing bodily nearer to your topic whereas utilizing the 1x (24mm) focal size, ends in a extra pure picture with higher focus, and fewer distortion.
The second picture (which I’ve cropped from the primary one) exhibits how the traces within the flooring in addition to the pot are supposed to look versus the distorted look you get with the 24mm (1x) shot. I haven’t modified the angle when taking the picture (or cropping it), so the variations within the notion are 100% actual.
Taking pictures in 35mm (1.5x) as a substitute of 24mm (1x) provides you with extra correct pictures usually however the place it is available in clutch is when taking pictures of individuals. It’s no coincidence many professional cameras include a 35mm lens as default – this focal size is nearer to what we see with our eyes, making individuals’s faces seem the way in which they need to. So, let’s depart 24mm in historical past please.
You need to use Photographic Types in your iPhone digicam – they’re greater than only a filter
Not a filter!
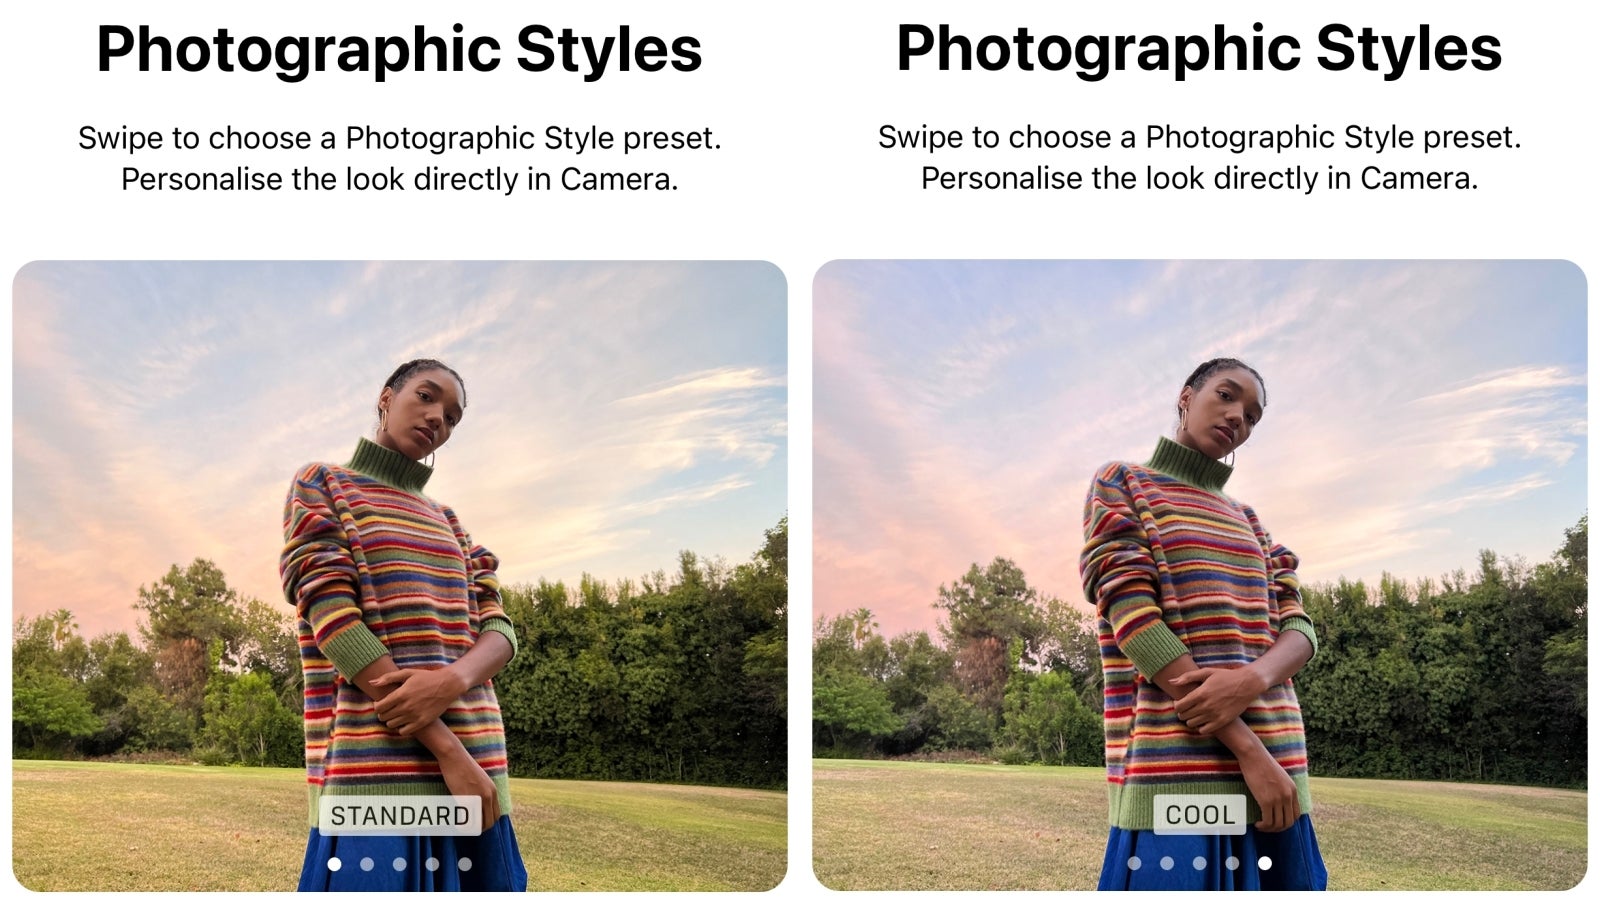
Final however not least, the iPhone has one other underrated function, which has been round for some time now – Photographic Types.
The principle motive I discover Photographic Types helpful is as a result of iPhone can generally take a photograph with little distinction, which lifts up the shadows and washes every part out. Including extra distinction via Photographic Types isn’t higher solely since you don’t must edit the picture, however as a result of this “edit” is baked into the precise picture properties, and isn’t a filter (which is why it’s larger high quality).
One thing else many individuals don’t learn about Photographic Types is that they are often adjusted to your liking. For instance, the Wealthy distinction model doesn’t should be tremendous contrasty, or the Heat one doesn’t should be tremendous heat. By dragging the sliders to regulate the types, you may get a “Wealthy heat” model that’s only a tad extra contrasty and hotter than the iPhone’s Regular model – with out overdoing it.
Observe that Photographic Types settings are preserved, which is nice if you happen to like a selected model and wish it to be on by default each time you hearth up the digicam. Nevertheless, sure distinction and saturation ranges don’t work for each shot, which is why you may need to double verify if you happen to’re in a Type that’s becoming in your picture. For instance, extra distinction could make evening pictures too darkish.
Apple retains refusing to present iPhone a correct “professional mode” however your iPhone digicam is far more versatile than you suppose
Whereas I’m positive you’ll know a few of the tips and options listed right here, I’m additionally fairly positive some individuals will be taught no less than one new iPhone digicam trick they didn’t know earlier than, and if that’s the case, then I’ve accomplished my job.
Truly, I’ve no less than 5 extra iPhone digicam ideas I can share with you however this text is already approach too lengthy, so that you’ll have to remain tuned for “Half 2” once you’ll be taught much more “area of interest” and arguably much more helpful iPhone digicam tips like:
- Methods to edit your entire pictures/movies in (actually) one click on – sure, it’s doable!
- Methods to take extra sensible pictures/movies
- Methods to take Portrait mode pictures with Evening mode on, and extra…